Introduction
Healthcare check-in kiosk implementation sits in an uncomfortable middle ground: more complex than IT teams expect, yet entirely manageable when the groundwork is laid first.
The complexity comes from three converging requirements: clinical workflow integration with live EHR data, HIPAA data handling controls across the data layer, and multi-device management across locations that can't afford downtime during patient intake hours. These aren't separate problems - they compound each other when implementation is rushed.
Most deployments are led by healthcare IT managers, clinic operations teams, or external integrators. Consumer hardware with DIY setup exists, but it carries real risk in any environment where patient data moves through the device.
Skipping the planning phase creates predictable failures:
- EHR sync breaks, leaving appointment lists stale at check-in
- Poor kiosk placement drives patients back to the front desk
- Device downtime goes undetected until a patient complains
- Data handling gaps surface during compliance reviews - not before
This guide covers the full implementation lifecycle: prerequisites, hardware selection, kiosk configuration, EHR integration, and post-launch validation - in the order they actually need to happen.
Key Takeaways
- Full deployment follows four phases: site prep → hardware/software setup → EHR integration → post-launch validation
- Confirm EHR/PMS integration before ordering hardware - retrofitting it later creates costly delays
- Kiosk mode lockdown via MDM keeps devices on-task and blocks unauthorized access
- Most post-launch failures stem from planning gaps, not hardware defects
- Multi-location deployments require centralized MDM with remote monitoring to stay manageable at scale
What to Expect From a Healthcare Kiosk Deployment
A full deployment follows four sequential stages: environment preparation, hardware and software configuration, system integration, and live validation. Each stage has dependencies; skip one, and the problems compound downstream rather than surface in isolation.
Timeline expectations:
- Single-site pilot: 2–4 weeks from procurement to go-live, assuming EHR integration is confirmed upfront
- Multi-location rollouts: Require centralized MDM infrastructure and phased scheduling. Deploying to active patient-facing locations simultaneously is a reliable way to create operational disruptions
Prerequisites and Compliance Considerations
Site readiness must be confirmed before hardware is ordered. Three things need to check out first:
- Physical space: Floor space and power access near the entrance or check-in counter, with ADA clearance for height and reach. Per U.S. Access Board guidance, unobstructed forward reach must fall between 15 and 48 inches above the floor. For obstructed reach over a counter deeper than 20 inches, maximum high reach drops to 44 inches. Operable parts must also require no more than 5 pounds of force and be usable without tight grasping or twisting.
- Network: Stable Wi-Fi with a dedicated SSID for kiosk devices. Shared patient or guest networks introduce both performance and security risks.
- Privacy: If the kiosk faces an open waiting area with no sightline control, patient data displayed on screen constitutes a compliance exposure. HHS guidance on incidental disclosures permits registration workflows only when reasonable safeguards are applied.
EHR/PMS Compatibility
Confirm whether your EHR vendor offers a check-in API or HL7/FHIR integration endpoints. Major platforms have documented paths:
- Epic: FHIR layer supports Appointment.Read and Appointment.$find
- Oracle Health Millennium: Exposes FHIR R4 APIs over HTTPS
- athenahealth: Dedicated Appointment Check-In API
- eClinicalWorks: FHIR support for third-party integrations
Kiosks without real-time EHR sync create duplicate entry problems and defeat the automation entirely.
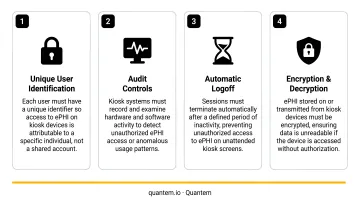
HIPAA technical requirements for kiosk deployments include:
- Encryption in transit and at rest for all patient data
- Automatic session logoff after a predetermined inactivity period (HHS lists this as an addressable safeguard under the Security Rule)
- Audit controls that record and examine activity in systems handling ePHI
- A Business Associate Agreement with any software vendor that creates, receives, maintains, or transmits PHI on your behalf
Hard Stops
Do not proceed if any of the following conditions exist:
- Wi-Fi coverage is inconsistent at the intended kiosk location
- EHR integration is unconfirmed or the vendor has no documented API path
- The physical space creates patient privacy exposure with no mitigation plan in place
Hardware and Software Requirements
Hardware Selection
Essential hardware components for a patient check-in kiosk:
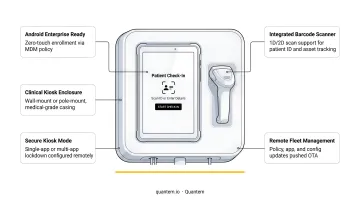
- Commercial-grade Android or Windows tablets (11-inch or larger)
- Durable enclosures rated for high-touch environments
- Floor-stand or wall-mount hardware with ADA-compliant height adjustment
- Optional peripherals: barcode/ID scanner for patient identification, EMV payment terminal for co-pay collection
Consumer tablets lack the MDM enrollment profiles needed for centralized fleet control. In a multi-location network, that means manual configuration at every site - a time and labor cost that scales badly as you grow.
Enterprise-grade hardware solves this at the device level. The Zebra ET4x-HC series, for example, is Android Enterprise Recommended, built with disinfectant-ready plastics, and ships with an integrated barcode scanner - along with the management infrastructure required for zero-touch provisioning.
Software Requirements
Three software layers are required:
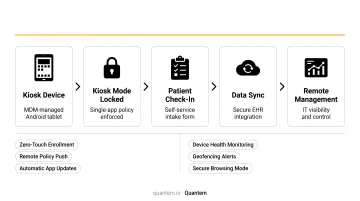
- MDM/kiosk mode platform - locks devices to the check-in workflow, prevents navigation outside the approved application, and provides IT with remote management visibility
- Check-in application - the patient-facing interface, either vendor-supplied or built into your EHR
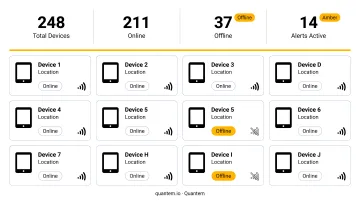
- Remote management dashboard - provides device health monitoring, alert thresholds, and fleet-level visibility without requiring on-site visits
Quantem's MDM platform covers all three layers out of the box. Key capabilities for healthcare kiosk deployments include:
- Built-in kiosk mode across all plans (Essential, Professional, and Enterprise), with tiered settings - Kiosk Essentials, Advanced Settings, and Kiosk Pro Settings
- Zero-touch enrollment for Android devices on Professional and Enterprise plans, so devices arrive at each clinic pre-enrolled and pre-configured
- Fleet-level visibility via remote dashboard, eliminating the need for on-site IT visits per location
For multi-site healthcare IT teams, zero-touch provisioning is the single biggest time saver - devices ship directly to each clinic and self-configure on first boot, with no manual setup required.
Step-by-Step Kiosk Setup Process
The setup sequence matters. Configuring software before confirming network stability, or placing kiosks before testing patient flow, are common shortcuts that cause rework. Follow this order.
Step 1: Site Preparation Position kiosks where patients naturally pause - near the entrance or adjacent to the check-in desk, not across the room. Install wayfinding signage directing patients to the kiosk. Confirm ADA reach range compliance. If the kiosk screen faces an open waiting area, install a privacy screen or physical barrier before go-live.
Step 2: Device Enrollment and Kiosk Mode Configuration Enroll devices into the MDM platform and apply the kiosk policy. This disables navigation controls and status bars, configures auto-restart on crash, and sets session timeout windows - typically 60–90 seconds of inactivity before the session resets.
For multi-site rollouts, use zero-touch provisioning profiles so devices arrive pre-enrolled. Quantem supports QR code enrollment on all plans, with Samsung Knox and zero-touch Android enrollment on Professional and Enterprise tiers.
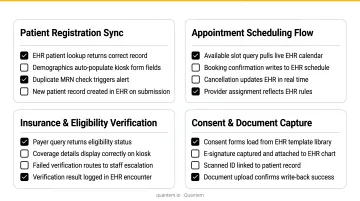
Step 3: EHR/PMS Integration Connect the check-in application to the practice management system via API or HL7 feed. Run integration tests with synthetic patient records before going live, validating:
- Appointment list retrieval (correct date, correct provider)
- Demographic updates writing back to the EHR correctly
- Insurance card scanning populating fields without manual correction
- Consent form signatures routing to the correct chart
Note: athenahealth's production API is rate-limited at 150 queries per second and returns a 429 error when exceeded. Confirm your EHR vendor's rate limits can handle peak-hour volumes before go-live.
Step 4: Staff Onboarding and Workflow Mapping Define which patient actions route through the kiosk (check-in, demographic update, consent signing, co-pay) versus which require staff intervention. Train front desk teams on three core scenarios:
- Assisting patients who struggle with the workflow
- Resetting a session mid-use without disrupting the queue
- Escalating a device fault to IT before it impacts check-in volume
This step gets skipped more than any other. Clinics that skip it typically see adoption rates plateau at 40–50% - well below the 70–80% achievable with proper training.
Step 5: Phased Pilot Launch Begin with a single kiosk during off-peak hours. Observe patient behavior directly. Measure completion rates. Gather staff feedback before expanding. Identify drop-off points in the workflow and resolve them before scaling to additional kiosks or locations.
Post-Deployment Validation
Validation is not a one-time checklist. After go-live, confirm each device is visible in the MDM dashboard, session timeout is functioning, and EHR sync is writing records accurately. Run a minimum of 20 test check-in cycles across new and returning patient scenarios before declaring the deployment production-ready.
Functional checks to run:
- Kiosk displays the correct appointment list for the current day
- Insurance card scanning populates fields without manual correction
- Consent forms capture digital signatures and route to the EHR correctly
- Co-pay collection (if enabled) completes end-to-end without errors
- Session timeout resets the device to the start screen within the configured window
Signs of a failed deployment:
- Patients consistently abandoning mid-check-in
- Front desk staff overriding every kiosk interaction
- Device screens showing error states unreported by IT
- EHR records showing duplicate or missing entries after kiosk sessions
Catching these failure signs early depends on how quickly your MDM platform surfaces device status. Quantem's alert system provides offline status notifications across all plan tiers, with online status sync intervals of 15 minutes (Essential), 5 minutes (Professional), and 2 minutes (Enterprise). The Enterprise plan also includes 30-day device online/offline history, so IT teams can identify recurring downtime patterns before patients or staff have to report them.
Common Implementation Problems and How to Fix Them
Most post-launch failures are planning failures - they just surface after go-live. Here are the three issues that come up most often and exactly how to fix them.
EHR Sync Failures
Problem: Patients complete check-in, but updates don't appear in the EHR, or the appointment list is stale - causing patients to be turned away or re-checked in manually.
Likely cause: API credentials misconfigured during integration setup, or the EHR polling interval is too slow for peak patient volume. API rate limit errors (like athenahealth's 429 response) are a common silent failure mode.
Fix:
- Revalidate API authentication tokens and confirm credentials are current
- Check that the EHR vendor's rate limit accommodates your peak check-in volume
- Implement local appointment caching so the kiosk holds a day's schedule snapshot and writes back only on form completion
Low Patient Adoption
Problem: Patients queue at the front desk and ignore the kiosk, or begin check-in and abandon partway through.
Likely cause: Poor kiosk positioning, a workflow with too many steps, or no staff member available to guide first-time users - particularly older patients unfamiliar with the format.
Fix:
- Reposition the kiosk in the patient's natural sightline as they enter
- Reduce the workflow to the minimum required steps
- Add type-to-sign as an alternative to touchscreen signatures
- Station a staff member near the kiosk for the first 2–3 weeks to guide first-time users
The upside is significant when adoption succeeds: a 2020 study of 40,528 ED visits found that EDs with self-check-in kiosks had 56.8% shorter wait times than those without. That outcome depends entirely on patients actually using the kiosks.
Device Downtime and Fleet Drift
Problem: Kiosks go offline, freeze, or run outdated software versions without IT being aware - resulting in patient-facing errors during busy check-in hours.
Likely cause: No centralized remote monitoring; device faults are only discovered when a patient or staff member reports them.
Fix:
- Enroll all kiosk devices in an MDM platform with active health monitoring and alert thresholds
- Schedule automatic overnight software updates to prevent version drift across your fleet
- Keep a spare device per location pre-enrolled and ready to swap in without manual configuration
Best Practices for Healthcare Check-In Kiosk Deployments
Design the Workflow Around the Patient
The target is a complete check-in in under 3 minutes: confirm identity, update key demographics, sign consent, pay co-pay. A 2024 NIH/PMC analysis found that a 2.5-minute reduction in check-in time per patient could reduce waiting time to triage by 26%. Every unnecessary step is a friction point that costs adoption.
Build compliance in from day one. These are configuration decisions, not retrofits - confirm them before deployment, not after:
- Encrypted data transmission between kiosk and EHR
- Automatic session logouts after each patient interaction
- No PHI retained on the device after session end
- Audit logs accessible to compliance officers
Confirm that both your MDM platform and check-in application vendor can provide security certifications and compliance documentation. Quantem holds SOC-2, GDPR, and CCPA certifications; any vendor handling PHI should be able to provide equivalent documentation and sign a BAA.
Establish a Multi-Location Management Strategy Before Scaling
Use zero-touch provisioning profiles and a centralized MDM console so each new site doesn't require a manual setup visit. Define IT ownership of the kiosk fleet separately from check-in application support - these are two distinct systems with two distinct escalation paths.
Document everything and version-control it. Maintain records of all kiosk policies, EHR API credentials, and network settings. Staff turnover and device replacements create costly rediscovery delays when configuration exists only in someone's memory.
A runbook covering three scenarios alone will cut downtime from hours to minutes:
- Resetting a kiosk to its baseline policy state
- Re-enrolling a replacement device without an on-site IT visit
- Restoring EHR sync after a credentials change or API update
Conclusion
The kiosk hardware brand matters far less than the quality of the implementation behind it. A mid-range commercial tablet with correct EHR integration, kiosk mode lockdown, and remote monitoring will consistently outperform an expensive purpose-built unit installed without those fundamentals.
Approach this as a phased operational project: prepare the environment thoroughly, pilot before scaling, validate rigorously with real patient scenarios, and iterate based on actual usage data. The practices covered here aren't optional optimizations - they're the difference between a deployment that holds up at six months and one that gets quietly shelved.
Tools like Quantem's built-in kiosk mode and remote device monitoring give IT teams the control layer these fundamentals depend on, without adding complexity to an already demanding rollout.
Frequently Asked Questions
What is kiosk mode on tablets?
Kiosk mode locks a tablet to one or more approved applications, disabling navigation controls, status bars, and access to device settings. In a healthcare check-in environment, this keeps devices on-task and prevents patients or visitors from accessing anything outside the approved workflow during a public waiting room session.
How does a patient use a self-check-in kiosk?
The patient approaches the kiosk and confirms identity via name and date of birth or a barcode scan. From there, they review and update demographics, sign any required consent forms digitally, and optionally pay a co-pay. Most patients complete the full process in under 3 minutes before being directed to the waiting area.
What does a healthcare check-in kiosk cost?
Medical-grade kiosk enclosures vary widely based on peripherals: ID scanners, EMV payment terminals, and ADA-compliant mounting hardware all add cost. MDM-managed commercial tablets offer a lower hardware entry point. Total cost of ownership should factor in software licensing, MDM management fees (Quantem's MDM plans start at $1/device/month), and any EHR integration development work.
Do healthcare check-in kiosks need to be HIPAA compliant?
The kiosk hardware itself isn't directly regulated under HIPAA, but the data it collects and transmits is. The software platform, EHR integration layer, and device management system must all meet HIPAA's security and privacy requirements. That means encryption, session timeouts, audit controls, and a signed BAA with any vendor handling PHI.
Can existing tablets be used as healthcare check-in kiosks?
Yes - commercial Android or Windows tablets work well when enrolled in an MDM platform that enables kiosk mode lockdown and remote management. The key requirements are sufficient screen size (11 inches or larger is recommended), reliable Wi-Fi connectivity, and compatibility with the check-in software and EHR integration layer.
How long does implementation take?
A single-site pilot typically takes 2–4 weeks from hardware procurement to go-live when EHR integration is confirmed upfront. Multi-location rollouts depend on the MDM provisioning strategy. Zero-touch enrollment cuts per-site deployment time considerably compared to manual device configuration at each location.