The problem is that Android offers several paths to kiosk mode, and they're not equivalent. Screen pinning looks like kiosk mode but any user can exit it. An MDM handles provisioning but abstracts the implementation. Programmatic kiosk mode using the Device Policy APIs gives you genuine system-level control - but only when the prerequisites are met and the version-specific quirks are handled.
This guide walks through the exact steps: creating the DeviceAdminReceiver, setting Device Owner via ADB, calling setLockTaskPackages(), and hardening the UI. It also covers where things commonly go wrong and when a different approach is the smarter call.
Key Takeaways
- Lock Task Mode (Android 5.0+) is the correct API for enterprise kiosk - not screen pinning
- Device Owner must be set via ADB before
startLockTask()provides real lockdown - Without
setLockTaskPackages(), your app enters screen pinning, not kiosk mode - Boot persistence requires a
BootReceiverandaddPersistentPreferredActivity()- it doesn't happen automatically - OEM firmware differences (especially Samsung) require additional testing beyond standard API calls
How to Enable Android Kiosk Mode Programmatically
Step 1: Create the DeviceAdminReceiver and Admin Policy File
Start by creating a class that extends android.app.admin.DeviceAdminReceiver. This acts as the entry point for all device policy events - nothing in DevicePolicyManager works without it.
class MyDeviceAdminReceiver : DeviceAdminReceiver() {
    companion object {
        fun getComponentName(context: Context): ComponentName {
            return ComponentName(context.applicationContext, MyDeviceAdminReceiver::class.java)
        }
    }
}
getComponentName() returns the ComponentName you'll pass to DevicePolicyManager calls throughout your app.
Next, create res/xml/device_admin_receiver.xml to declare which policies your app can enforce:
<device-admin>
    <uses-policies>
        <disable-keyguard-features />
        <force-lock />
    </uses-policies>
</device-admin>
Finally, register the receiver in AndroidManifest.xml:
<receiver
    android:name=".MyDeviceAdminReceiver"
    android:permission="android.permission.BIND_DEVICE_ADMIN">
    <meta-data
        android:name="android.app.device_admin"
        android:resource="@xml/device_admin_receiver" />
    <intent-filter>
        <action android:name="android.app.action.DEVICE_ADMIN_ENABLED" />
        <action android:name="android.app.action.PROFILE_PROVISIONING_COMPLETE" />
    </intent-filter>
</receiver>
Note: BOOT_COMPLETED belongs on a separate BroadcastReceiver, not on the DeviceAdminReceiver itself. Add it to a dedicated BootReceiver class for boot persistence (covered in Step 4).
Step 2: Set Your App as Device Owner via ADB
This is the step most developers either skip or get wrong. Device Owner cannot be set on a device that already has Google accounts associated with it. Before running the ADB command:
- Factory reset the device
- Go through the setup wizard but do not add any Google accounts
- Verify under Settings → Accounts that no accounts exist
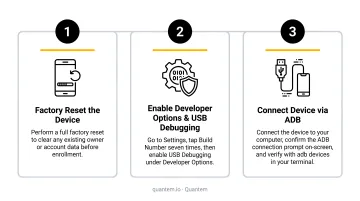
Then run:
adb shell dpm set-device-owner com.yourpackage/.MyDeviceAdminReceiver
Successful output:
Success: Device owner set to package com.yourpackage
Failure output:
Not allowed to set the device owner because there are already several users on the device
If you see the failure message, the device has existing accounts or users - factory reset and start clean.
Device Owner status cannot be removed by re-running the ADB command. Removal requires calling DevicePolicyManager.clearDeviceOwnerApp() from within your app, or a factory reset. Build an authenticated exit flow before deploying.
Step 3: Allowlist Packages and Start Lock Task Mode
According to Android's Lock Task Mode documentation, calling startLockTask() without first allowlisting the package via setLockTaskPackages() only triggers screen pinning - not true kiosk lockdown. Users can exit screen pinning at any time.
Here's the correct sequence:
val dpm = getSystemService(Context.DEVICE_POLICY_SERVICE) as DevicePolicyManager
val adminComponent = MyDeviceAdminReceiver.getComponentName(this)

// Allowlist your package (or multiple packages for multi-app kiosk)
dpm.setLockTaskPackages(adminComponent, arrayOf(packageName))

// In your Activity's onResume():
override fun onResume() {
    super.onResume()
    if (dpm.isLockTaskPermitted(packageName)) {
        startLockTask()
    }
}
Call isLockTaskPermitted() before startLockTask(), and invoke startLockTask() from onResume(). The activity must be in the foreground - this is required on pre-Android 9.0 devices.
For Android 9.0+ (API 28), you can launch another app's activity directly into lock task mode using ActivityOptions.setLockTaskEnabled(true). This is useful in Enterprise Mobility Management (EMM) architectures where the Device Policy Controller (DPC) needs to start a secondary app without requiring that app to call startLockTask() itself.
Step 4: Apply User Restrictions and UI Hardening
With lock task mode running, address the remaining ways users can exit kiosk mode.
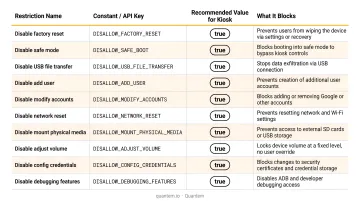
Apply user restrictions via DevicePolicyManager.addUserRestriction():
| Restriction | What It Prevents |
|---|---|
DISALLOW_FACTORY_RESET |
User resetting the device |
DISALLOW_SAFE_BOOT |
Booting into safe mode to bypass kiosk |
DISALLOW_ADD_USER |
Creating new user accounts |
DISALLOW_ADJUST_VOLUME |
Volume button manipulation |
Harden the UI:
// Disable keyguard and status bar
dpm.setKeyguardDisabled(adminComponent, true)
dpm.setStatusBarDisabled(adminComponent, true)

// Keep screen on while plugged in
dpm.setGlobalSetting(adminComponent,
    Settings.Global.STAY_ON_WHILE_PLUGGED_IN, "3")
Note: setKeyguardDisabled() and setStatusBarDisabled() are available to device owners and profile owners of organization-owned managed devices - not exclusively device owners.
Configure boot persistence:
// Register kiosk activity as default HOME handler
val filter = IntentFilter(Intent.ACTION_MAIN).apply {
    addCategory(Intent.CATEGORY_HOME)
    addCategory(Intent.CATEGORY_DEFAULT)
}
val activity = ComponentName(packageName, "com.yourpackage.KioskActivity")
dpm.addPersistentPreferredActivity(adminComponent, filter, activity)
Add a separate BootReceiver with RECEIVE_BOOT_COMPLETED permission to re-initiate lock task mode after restart. Without this, a single reboot exits kiosk mode entirely.
When Is Programmatic Kiosk Mode the Right Choice?
Programmatic Device Owner kiosk mode makes sense when:
- You control the full device lifecycle from provisioning to retirement
- Devices are dedicated single-purpose hardware (POS, patient check-in, warehouse scanners)
- You need restrictions that survive reboots and cannot be bypassed by users
It becomes impractical when:
- Devices already have Google accounts (consumer or BYOD devices)
- The app is distributed via Play Store to end users who self-install
- IT doesn't have ADB access during provisioning and zero-touch enrollment isn't configured
- You're managing more than a handful of devices manually
At scale - say, 20+ devices - running individual ADB commands becomes unsustainable quickly. At that threshold, pairing programmatic setup with an enrollment workflow or MDM platform like Quantem eliminates the manual overhead and keeps deployments consistent across your entire fleet.
Key Variables That Affect Kiosk Mode Behavior
Getting the code right is necessary but not sufficient. These system-level factors determine whether your implementation actually holds.
Android API Level Compatibility
Lock Task Mode capabilities vary significantly across Android versions:
| Android Version | API Level | What Changed |
|---|---|---|
| Android 5.0 | 21 | Lock Task Mode introduced |
| Android 8.0 | 26 | Lock task available to affiliated secondary users |
| Android 9.0 | 28 | ActivityOptions.setLockTaskEnabled(true) added |
| Android 10 | 29 | RoleManager and ROLE_HOME added |
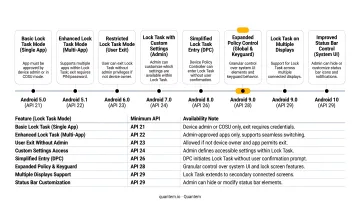
Code that works on an Android 13 Pixel may fail silently on an Android 9 Samsung device. Plan for version-aware handling from the start, not as an afterthought.
OEM Firmware Customizations
Standard Lock Task Mode doesn't account for OEM system UI modifications. Test every target OEM separately - behavior on one device does not transfer to another.
Key OEM and API considerations:
- Samsung Knox: The Knox Kiosk Mode SDK adds controls beyond
DevicePolicyManager, including hiding the notification bar and blocking specific system interactions - Deprecated API:
ACTION_CLOSE_SYSTEM_DIALOGSwas deprecated in Android 12 (API 31) - apps targeting API 31+ will receive aSecurityException; useGLOBAL_ACTION_DISMISS_NOTIFICATION_SHADEfor notification shade dismissal instead
Device Owner Status
Without Device Owner, startLockTask() falls back to screen pinning. Users can exit screen pinning by holding Back + Recents (on 3-button navigation) or equivalent gestures on other navigation modes.
Always verify with isDeviceOwnerApp() before deployment. A kiosk that looks locked during testing but exits on user interaction in the field is the most common and costly mistake.
Common Mistakes and How to Fix Them
Mistake 1: Treating Screen Pinning as Kiosk Mode
Developers call startLockTask() without Device Owner set, see a locked-looking screen, and assume it works. Before signing off, verify both isDeviceOwnerApp() and isLockTaskPermitted() return true.
Mistake 2: Skipping Boot Persistence
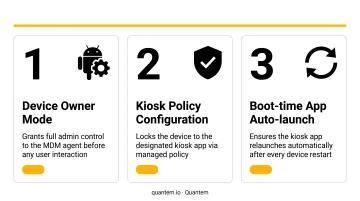
A single reboot reverts the device to the normal launcher. Always test the full power-off/power-on cycle. All three components must be in place:
RECEIVE_BOOT_COMPLETEDpermission declared in the manifest- A
BootReceiverthat relaunches the kiosk app on startup addPersistentPreferredActivity()to pin the home intent
Mistake 3: Hardcoded Exit Passwords in the APK
Use Android Keystore, server-side PIN validation, or MDM-issued exit tokens - APKs are trivially decompilable. Android's security documentation flags hardcoded credentials explicitly, and the OWASP Mobile Top 10 categorizes them as improper credential usage.
Mistake 4: Skipping Status Bar and Power Button Hardening
startLockTask() alone doesn't block the status bar pull-down or power button menu. Call setStatusBarDisabled() and confirm users can't reach settings through notification shade interactions. Physical button access is a real vector on public-facing hardware, so test it explicitly.
Alternatives to Programmatic Kiosk Mode
Screen Pinning (No Device Owner Required)
When it works: Consumer-facing scenarios, quick demos, low-security needs with trusted users.
Trade-offs:
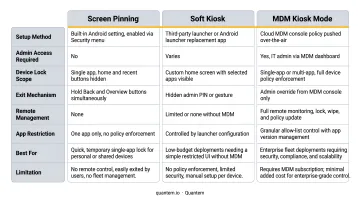
- Users can exit via Back + Recents (3-button nav) or swipe-up-and-hold (gesture nav)
- No ability to disable the status bar or restrict system settings
- Does not survive reboots automatically
- Not appropriate for unattended or public-facing deployments
Soft Kiosk Using ROLE_HOME and Overlays (Android 10+)
When it works: Play Store app distribution without MDM enrollment, or when Device Owner provisioning isn't possible. The RoleManager API (added in API 29) lets your app request the ROLE_HOME role, making it the default launcher.
Trade-offs:
- Requires user consent via system dialog (
createRequestRoleIntent()) - Determined users with Android knowledge can work around overlay-based restrictions
- Less robust than Device Owner mode, but viable when ADB provisioning isn't an option
MDM Platform
When it works: Deploying kiosk mode across tens or hundreds of devices where manual ADB provisioning doesn't scale.
A platform like Quantem includes built-in kiosk mode across all pricing plans, with no custom DeviceAdminReceiver code, no ADB commands, and no scripting required. Zero-touch enrollment handles provisioning at scale; kiosk policies push remotely via toggle-based controls.
Trade-offs:
- Devices must be enrolled in the MDM platform
- Highly custom kiosk logic with unique business rules may benefit from a fully coded approach over preset policy options
Frequently Asked Questions
What is the difference between lock task mode and screen pinning on Android?
Lock task mode requires Device Owner privileges and prevents users from exiting entirely ; the system-level restriction is enforced by the DPC. Screen pinning is a user-accessible feature that any user can exit by holding Back + Recents simultaneously. For enterprise kiosk deployments, lock task mode is the correct choice.
Can I enable Android kiosk mode programmatically without root access?
Root is not required. Device Owner is set via adb shell dpm set-device-owner on an unprovisioned device with no Google accounts. Once set, DevicePolicyManager APIs provide system-level kiosk controls, with no rooting needed.
What Android version is required for programmatic kiosk mode?
Lock Task Mode is available from Android 5.0 (API 21). Starting other apps into lock task mode via ActivityOptions requires API 28. RoleManager for soft kiosk approaches requires API 29. Devices below these thresholds have reduced or no capability for the corresponding features.
Does Android kiosk mode survive device reboots?
Not by default - startLockTask() does not persist across reboots. To fix this, configure a BootReceiver with RECEIVE_BOOT_COMPLETED permission and call addPersistentPreferredActivity() to register the kiosk activity as the default HOME handler, ensuring it reactivates automatically after every boot.
How do I exit kiosk mode programmatically?
An activity exits lock task mode by calling stopLockTask(). Alternatively, pass an empty array to setLockTaskPackages() via your Device Policy Controller, which finishes any activity currently in lock task mode. Always build and test an authenticated exit mechanism before deployment.
Can users bypass Android kiosk mode even when set up correctly?
A properly configured Device Owner kiosk is resistant to software-level bypass, though physical device access remains a risk. However, hardware buttons (power, volume) and OEM-specific UI elements remain potential vectors. For public-facing deployments, physical kiosk enclosures that block hardware buttons are strongly recommended alongside the software controls.